General
IT Support Guide
How to access the service desk portal
How to Change Your Default PDF Viewer on Windows, macOS, Chrome, and Microsoft Edge
How to Verify It’s Really Cloud Collective Calling
Introduction to AutoElevate
Introduction to 1Password
File Naming Best Practices
Microsoft Office / Office 365
Mobile Device Setup
Outlook App Setup on Android
Outlook App Setup on IOS
Enrolling Your iPhone in Intune
How to Remove Mail Accounts from the Outlook App
Setting up Teams on iOS
Setting up Outlook app for iOS
IOS Intune Setup
Android Intune Setup
How to set up a mobile hotspot (iPhone/Android)
Outlook Mobile Sync Fix
Installing Microsoft Teams on iOS
Installing Microsoft Teams on Android
Link Office 365 to Android (Samsung) Apps
Add an O365 account to Blackberry Hub
Multi-Factor Authentication
Multi-Factor Authentication (MFA) Setup (IOS)
Multi-Factor Authentication (MFA) Setup
How To Use Number Matching with Multi-Factor Authentication (MFA)
Multi-Factor Authentication (MFA) Setup - SMS only
Changing Multi-Factor Authentication to a new phone
Teams
Adding a Call Delegate
Guide to Physical Phones
Signing into a Physical Phone for Teams
Teams Troubleshooting
Basic Teams Voice Information
Call Forwarding in Teams
How to add safe sender
Add Public Folder Calendars
How to Unlock Your Account VIA the Microsoft Online Password Reset Portal
Remove Velixo Add-In in Excel
Azure Storage Explorer
Advanced Permission Management for SharePoint Sites and Folders
How to Set an Automatic Reply for a Shared Mailbox
How to edit or change your email signature
Sharing files in SharePoint
How to Send Emails Out as a Shared Mailbox Alias
Accessing Netdocuments on OWA
Adding Room/Equipment Calendar to Outlook
How to Send emails as an alias
How to Remove Inherited Permissions and Grant Permission to a Sharepoint Folder/File
Outlook Classic Signature Management
Adding internet calendars to Outlook
How to Setup & How to Perform Self-Serve Password Resets
Share/Grant Permissions to Calendar in Office (Desktop/Web)
Add Shared Calendar
How to Enable Notification for OneDrive folders
Understanding the Difference Between OneDrive and SharePoint
How to Setup Email Rules for a Shared Mailbox
Open Shared Mailbox / User's Mailbox in Outlook on the Web (OWA)
Microsoft Defender for Office 365 & The Report Messages Add-On
Onedrive and Known Folder Move (KFM)
Access your Online Archive in the Outlook Client
Sharing Files with Onedrive Desktop
Add Public Folder Calendars
How to add Teams "Call me" Signature hyperlink
Accessing Quarantined Emails
How To Password Protect your Office Files
Working with SharePoint
How to Remove Metadata from Microsoft Word Files
Invite users to mail lists
Sharepoint
Find & release quarantined messages in Exchange Online
Exporting OneNote Notebook
Sync your SharePoint Libraries to Windows Explorer
How to Create Signature Auto Text in word
Set Signature in Outlook
Add Public Folder Contact Lists
Activate Office 365
Add Quick Access Toolbar from Saved File
Located Item/Folder Missing in Outlook
Add Shared Mailbox in Outlook
Share Outlook Contacts Folder
Recover Deleted Outlook Items
Find Folder Path in Outlook
Add Public Folder Contact Lists
Remote Desktop
Microsoft MFA for Remote Desktop Gateway
Redirect Local Resources over RDP
Access Remote Desktop via IOS
Use Remote Desktop from a Mac
How to Redirect Remote Print Jobs to a Home Printer
Edit Remote Desktop settings on Windows 10
Edit Remote Desktop settings in Microsoft Remote Desktop 10
Change your RD Gateway URL (Mac)
Change your RD Gateway URL (Windows)
Use Remote Desktop on a mobile device
How to change your password in a remote connection
Get Sound on a Local Machine from a Remote Session
Adobe
Set Adobe To Be Default PDF Reader
Change New Adobe Acrobat Pro to Old Adobe Acrobat Pro
Adobe PDF Combine Tool Error
How to activate your Adobe account
Security
Windows
Bluetooth Headset Troubleshooting Guide
Reset your Domain password
How to find the name of a computer
Strategies for managing maximum file length limits
Clear Chrome Cookies & Cache
Set Default Apps in Windows
Workaround for File Explorer Crashing
Worldox
NetDocuments
3CX
Sitelink
Switch Sitelink to classic UI
SiteLink End of Shift Procedure
How to fix "Previous Instance of SiteLink Running" error
Security
VPN
Printers & Scanners
How to add a network printer
How to change printer settings such as single-sided printing, page size, etc.
Mac
- All Categories
- Microsoft Office / Office 365
- How to Create Signature Auto Text in word
How to Create Signature Auto Text in word
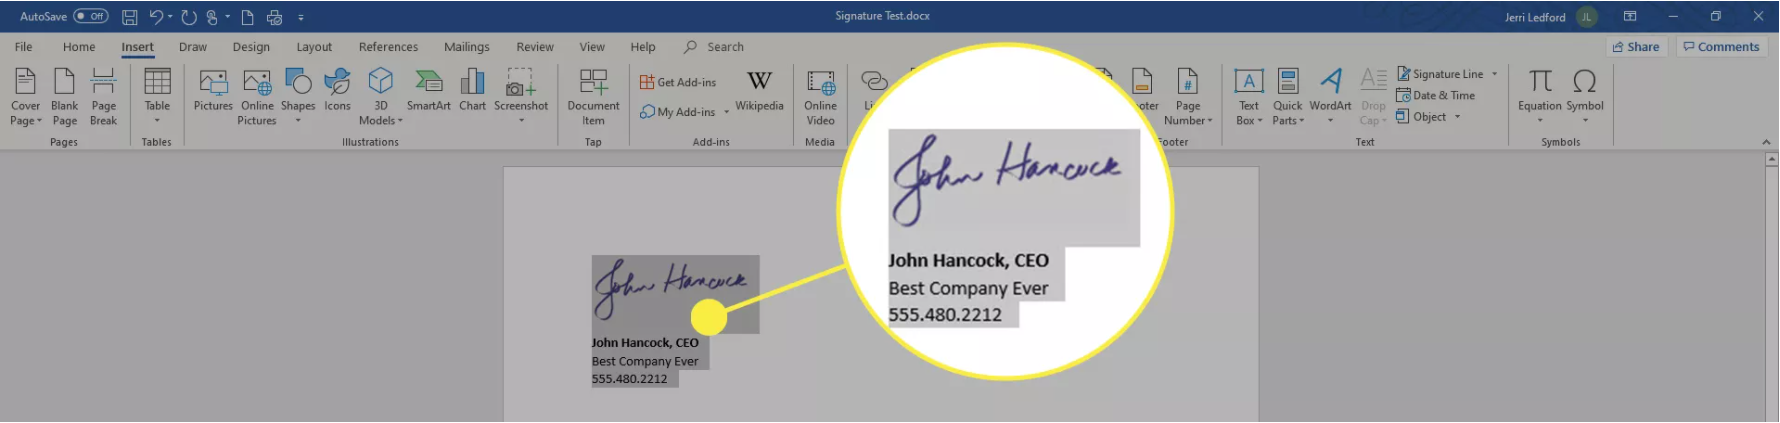
Use Word’s Quick Parts or AutoText feature to create a complete signature that includes your handwritten signature and typed text, such as your job title, email address, and phone number. Begin by creating and inserting a handwritten signature, then follow the steps for your version of Word.
The instructions in this section apply to Word 2019, 2016, 2013, 2010 and Word for Microsoft 365; as well as Word 2016 for Mac and Microsoft 365 for Mac
Instructions
1. Type the information you want to use directly beneath the inserted signature image. Format the text as you want it to appear when you insert the signature block in documents.
2. Drag your mouse over the image and text to select and highlight it.
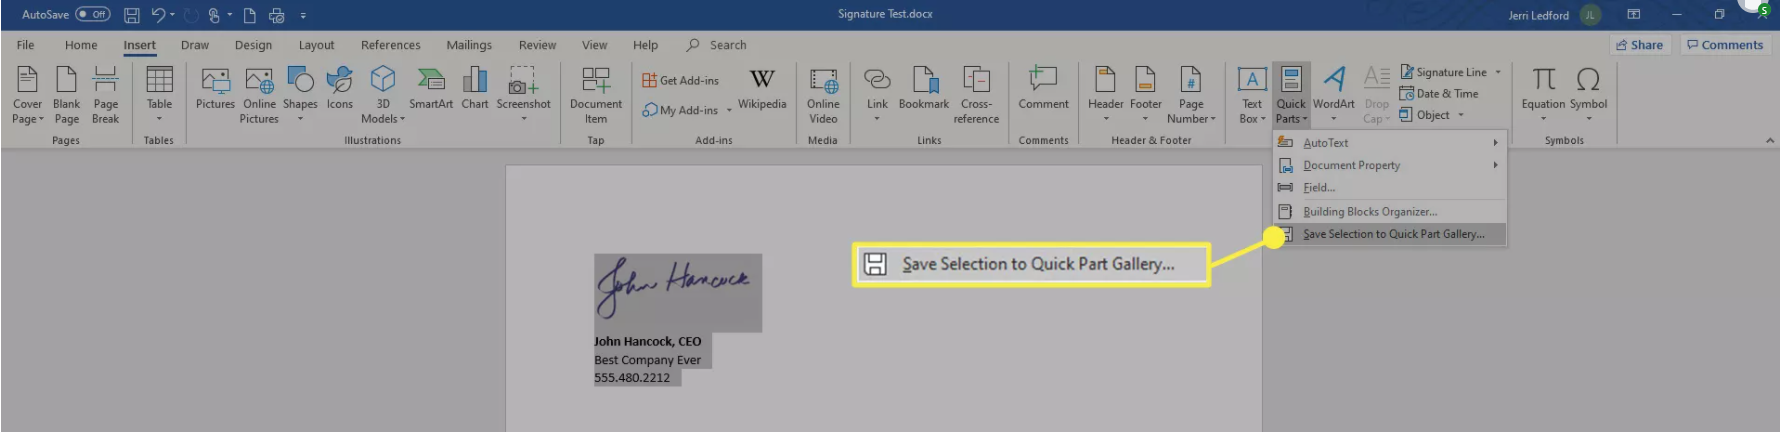
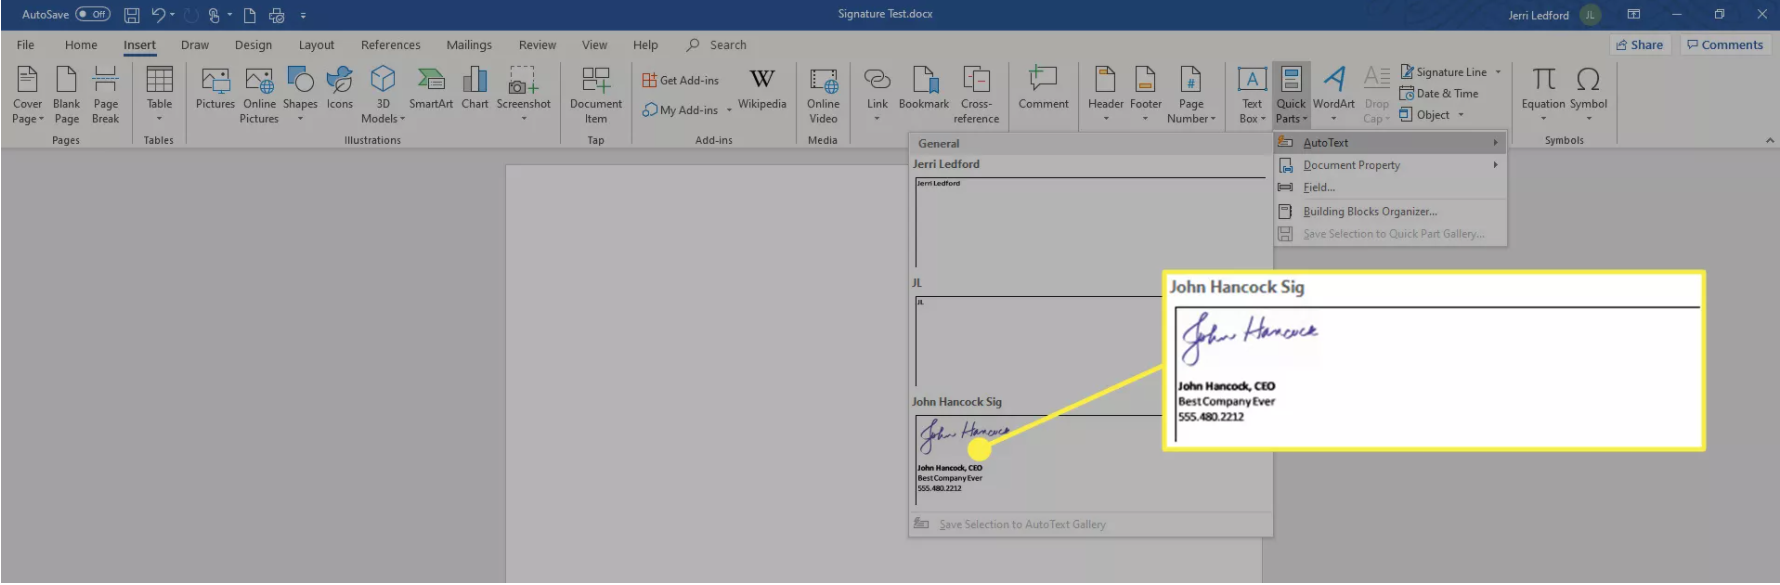
3. Go to the Insert tab and select Quick Parts in the Text group.
4. Choose Save Selection to Quick Part Gallery. The Create New Building Block dialog box opens.
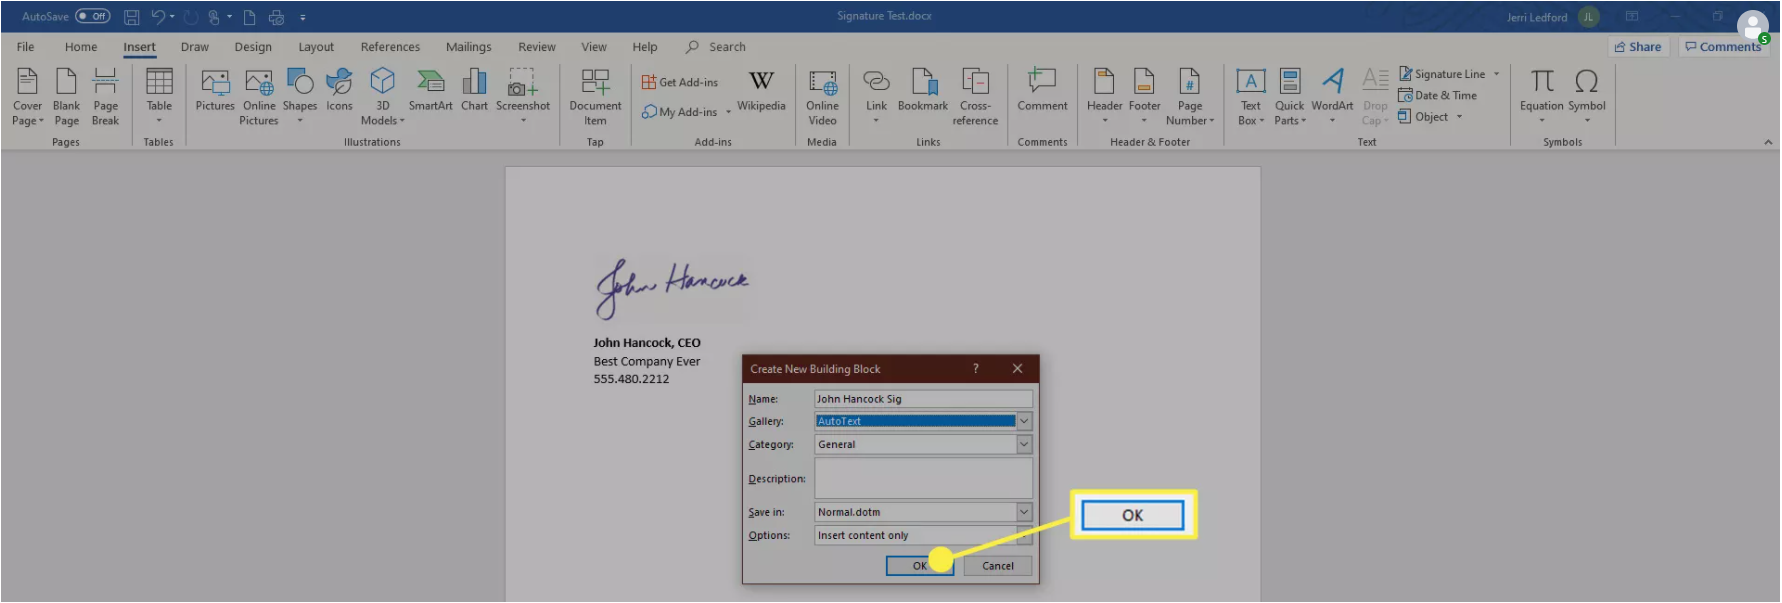
5. Type a name for the signature block.
6. Choose AutoText in the Gallery Box and select OK to save the signature block.
Any time you want to add the signature in Word, go to the Insert tab, select Quick Parts, point to AutoText, and select the name of the signature block.
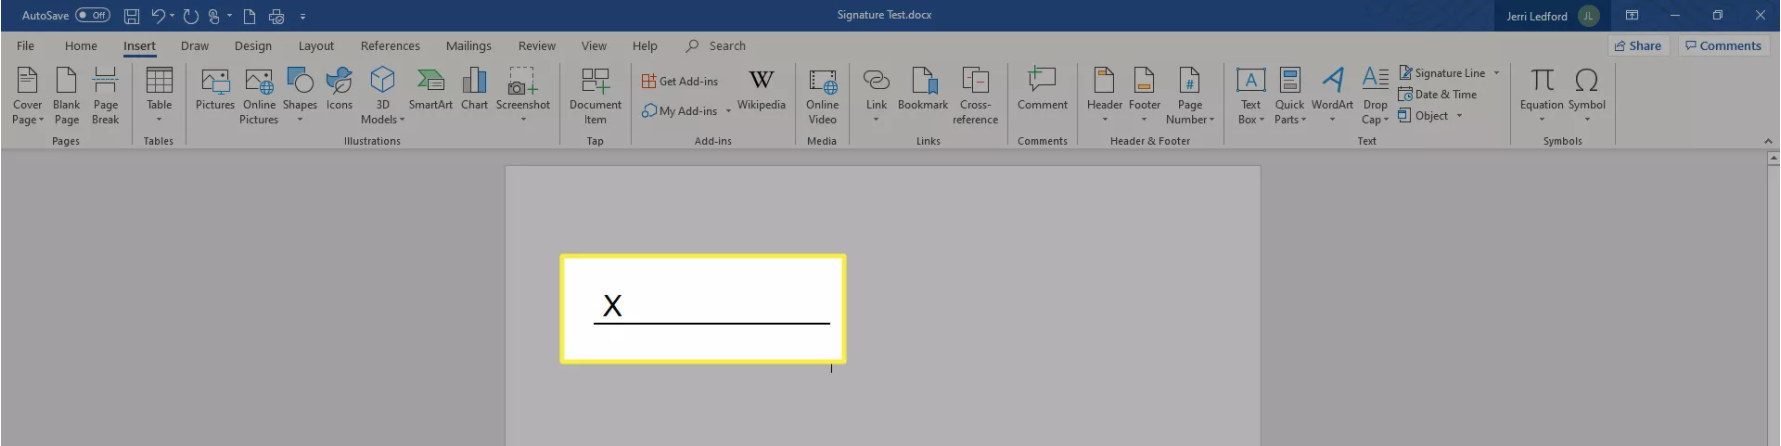
How to Add a Blank Signature Line
To add a blank signature line to allow someone to sign a printed document, insert a normal signature line but without any contextual data.
This feature is not currently supported in Word for Mac.
1. Select a space in the Word document.
2. Go to the Insert tab and select Signature Line.
3. Select any options you want and choose OK. Selecting few or no options leaves a blank line.
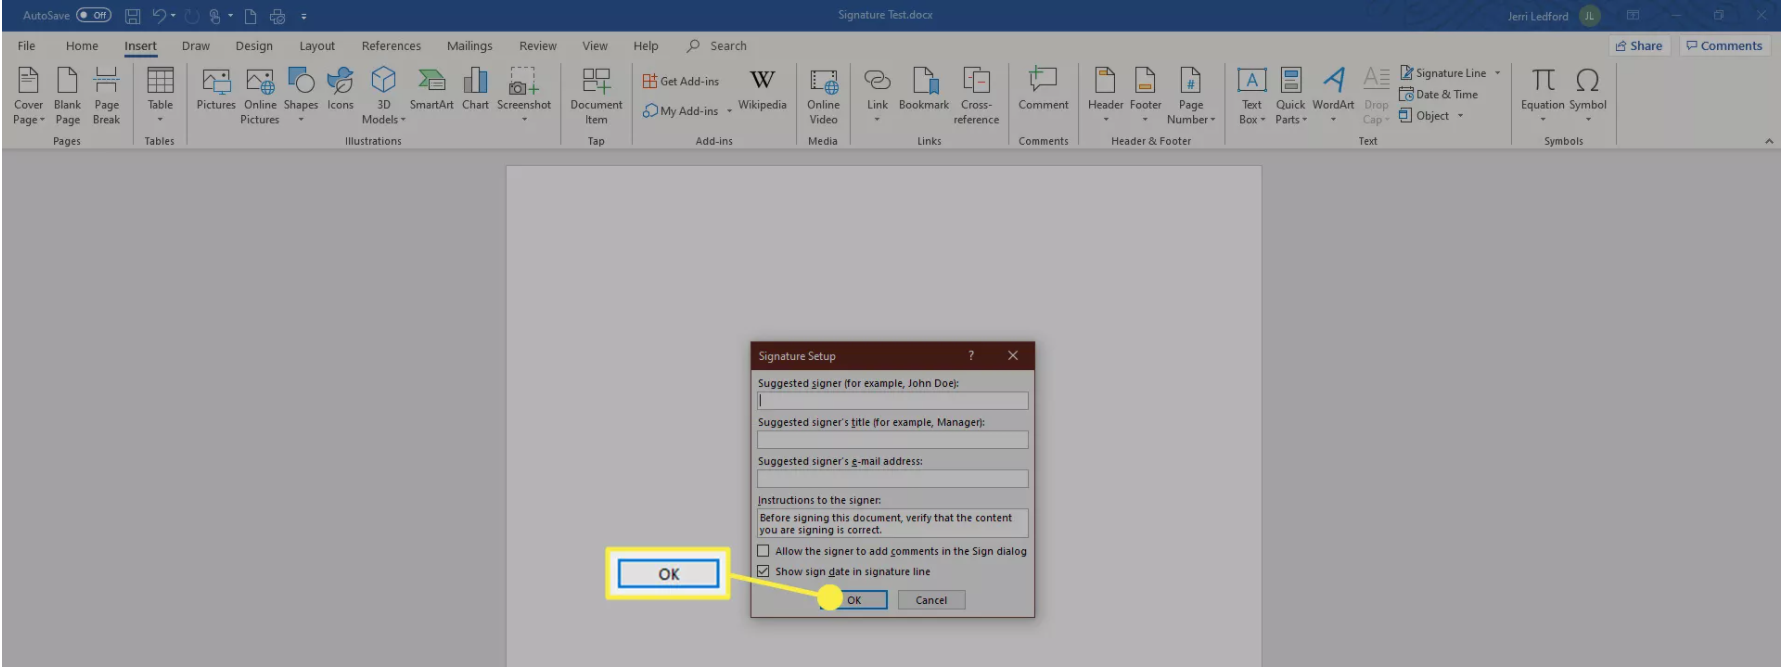
4. A signature line appears ion the document where you placed your cursor.